ad tag

728x90

December 30, 2014

Bouncing Balls... (or how to make fish balls "Q-Q")


Chinese Fish Ball Tang Hoon Soup
When the cold north winds blows, one of the best things to have is a good steaming bowl of soup. I love all manner of soups - thick rich pumpkin soups, old fashioned minestrone with lots of vegetables and beans and my all time favourite; a hearty split pea with ham. Sometimes, I get a craving for soups from my childhood - peppery, garlicky "bak kut teh" (pork rib "tea" / soup) and recently fish ball "tang hoon" (bean vermicelli) soup.

Problem is, out here in the Kootenays, fish balls are as rare as polar bears in the Straits of Malacca. So it's back to DIY. I had tried this once before and ended up with very soft fish balls, more like fish quenelles, rather than the typical springy bouncy texture that chinese fish balls have. This texture is also described as "QQ" - for the life of me, I do not know the chinese word for it, so I'll have to make do with the onomatopoeia.

The key or secret to springy fish balls has to do with food science. Remember how we have to knead bread dough to develop the gluten and make those strands all tangled and tight? And that these gluten strands trap the CO2 given off by the yeast giving a nice crumb and also providing that chewy texture? Meat / fish have protein strands and these strands need to be developed in a similar manner. Typically, the fishmonger in the Asian wet market will take hand-fulls of minced fish meat and slap or thrown them vigorously against the side of a large basin. We do that in the home kitchen too, but being mindful of clean-up afterward, one might chose to do this with the basin in a deep sink or else line your worktop with newspaper. Also important is not to use a food processor that finely minces the fish meat - this makes that tangle of protein strands harder to achieve. Once you have roughly  chopped the fish meat, the remainder of the "mincing" process should be carried out with the flat, non sharp edge of a chef's knife or chinese cleaver.

Pieces of firm white fish

The fish that I used was any firm white fish that I could find in the supermarket. Usually in SE Asia, the best fish balls are made with spanish mackerel or yellowtail snapper.

A word about the other ingredients:
1. Tang Hoon: vermicelli made from mung bean flour - available in most Asian grocers
2. Tian Jin Dong Choy (天津冬菜) - - available in some Asian grocers - salty, garlicky

Tian Jin preserved cabbage


Chinese Fish Balls
Ingredients:
1 kg white fish fillet, deboned (I used haddock)
1-2 tsp table salt (depending on how salty one likes their fish balls)
1/4 - 1/2 tsp white pepper
1 Tabsp corn starch

Method:
1. finely chop then mince the fish meat as described above
2. add the salt and pepper
3. gather up the fish mixture and throw / slap it vigorously against the side of a deep basin (I counted 100 throws)
4. add the cornstarch and mix thoroughly - a few more slaps would not hurt!
5. test cook a fish ball in boiling water to check for taste and texture - if it is not "QQ" enough, throw it about a bit more

Forming & Cooking the fish balls:
1. Bring a large pot of water to simmering (add 1tsp salt to each litre of water)
2. gather up a handful of fish mixture in your left hand (if you are right handed)
3. gently squeeze a small quantity through an "O" created by the thumb and fore-finger of the left hand and using a tablespoon dipped in cold water, scoop up a ball and drop that gently into the simmering water. (it will sink)
4. Once the fish ball is cooked, it will float to the top, scoop it out and place in a bowl.
5. Depending on the size of your pot, you can cook about 6-10 fish balls at a time.

This recipe makes approximately 24 fishballs


Cut the fish into small pieces 
finely chop the fish meat
gather the fish meat in both hands and "slap" it back into the basin with a good wrist action
the final result should look smooth and shiny
Forming the fish balls (1) - take a small handful in non dominant hand
Forming the fish balls (2) - use a teaspoon and scoop a round ball about 2cm diameter
Drop uncooked fish ball into simmering salted water
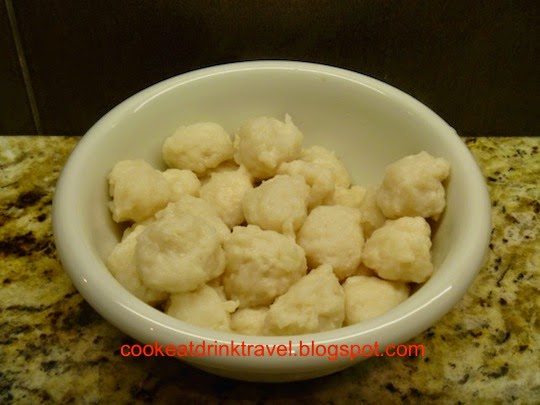
Fish balls will float when cooked

Fish Ball "Tang Hoon" soup

  • 1L fish stock
  • 24 fish balls
  • handful coriander / cilantro - chopped
  • small bunch scallions / spring onions - chopped
  • deep dried finely chopped garlic
  • deep fried finely sliced shallots
  • 2 small bundles bean vermicelli (not rice vermicelli) - soaked in cold water and cut into 3-4inch lengths with a pair of scissors
  • 1 Tbsp Tian Jin Dong Choy (天津冬菜) preserved vegetable rinsed and roughly chopped
Make the soup!

  1. bring the fish stock to boil
  2. add fish balls and preserved vegetable
  3. add the vermicelli
  4. simmer for 10min
  5. season to taste
  6. add as much cilantro and spring onions as you like
  7. sprinkle with deep friend onions and garlic just prior to serving
Makes 4 servings of 6 fish balls each

cooked fish balls


December 23, 2014

Tis the Season... for edible gifts (1) - Wine Jelly


Christmas tools around really quick! the older one gets, the faster time flies by. Christmas here is is kinda like Chinese New Year back in Singapore. Lots of visiting, feasting, and exchange of gifts (instead of "ang pows")

This is our 3rd Christmas here and we have been recipients of many little tokens of friendship, both edible and non edible and have experienced warmth and love. So in turn, since we're not too hot in the arts and crafts department - we  decided to make edible gifts. This year it's Wine Jelly and Cinnamon Bread.

Jars filled, waiting for labels

We chose my favourite varietal - Cabernet Sauvignon and set about filling our apartment with wine fumes as the jelly cooked. We did taste a glass - quality control of course, and pronounced it good everyday drinking wine, perfect for jelly.

all nicely labelled, ready to be delivered

Hints:
First make sure you have enough jars - I often get caught out with insufficient jars because I had not factored in the volume created by dissolved sugar!
Also ensure that your pot is large enough to contain the "roiling boil" that occurs - the hot jelly liquid rises up quite a ways in the pot. A large pot will save faint hearts from angina. You may stir the boiling wine mixture with a wooden spoon to try and prevent the scalding hot jelly from overflowing.

The recipe below makes 12 x 250ml / 24 x 125ml jars of jelly

Ingredients:
1.5L Red Wine (your favourite)
1 Cup (250ml) freshly squeezed lemon juice - about 4-5 large lemons
2 pkg (2x 57g) Bernadin Fruit Pectin
9 Cups extra fine granulated sugar

Sterilise the Jars:
There are various ways of sterilizing jars - I'll detail the two that I use most often

Oven Method:
1. wash jars in hot soapy water, rinse well and place on baking tray
2. place in cold oven and bring temperature up to 110C / 225F for 30min
3. allow to cool slightly before filling (in other words, leave in oven till ready to fill)

Dishwasher method:
This is great is you have a larger quantity of jars and haven't yet washed them.
1. place jars and lids in dishwasher
2. wash at the hottest setting
3. allow to dry (use heat dry setting) before use.

Sterilise the Lids:
1. place lids in large pan
2. pour boiling water over the lids and let sit for 10min.

Method:
1. Pour wine and lemon juice into large pot - whisk in pectin till dissolved
2. Measure sugar, set aside
3. Bring wine mixture to boil
4. Add sugar to wine mixture, bring up to a railing boil and boil hard for 1min (exactly)
5. Remove from heat
6. Skim foam if necessary
7. Bottle up to 5mm of rim of jar
8. Place lids (shake off any water) onto jars (hot!)
9. Carefully place rings over lids and screw down firmly.
10 Set aside on tray to cool.

I love sitting back after all the effort and listening for the lids to go "thuk" as the lids get sucked in and seal off the jars during the cooling process. Once the jars are well sealed and cool, wipe any sticky jelly drips off the sides and label.

Wine jellies are great with cheese and crackers and they also make a fantastic glaze for roasts.

match made in heaven? wine jelly, cheese and crackers

December 15, 2014

Saving my culinary heritage... one recipe at a time This time it's Ondeh - ondeh

Delicious Plate of Jade Green Ondeh Ondeh
Whenever we move to a new country, the locals assume that because we look "chinese" therefore the food we eat must be "chinese" aka fried rice, dim sum etc... But we're not from China! We're from Singapore! Our food roots come from South East Asia - Singapore, Malaysia, Indonesia, yes and also China, since we are ethnically chinese.

OK, enough ranting - so - we had some friends over for dinner and we decided to serve something "local" - Laska Lemak for mains. Then given a choice between making "appies" or dessert - the latter won. Now, I could easily whip up a decadent creamy sherry trifle or a sea -salt caramel apple crisp, but that wouldn't have been an appropriate sweet ending to the meal. After searching through our library of recipe books, Ondeh-ondeh came up tops. These scrumptious little balls have a lovely jade green colour and when coated with soft fragrant finely grated coconut, a mound of these on a plate look almost festive, Christmassy - like a little pine tree covered with snow.

Ondeh-ondeh (or onde-onde) are little balls of sweet potato / glutinous rice flour, filled with melted palm sugar and coated with grated coconut. They should have just enough chewiness in the dough to avoid being stodgy, yet enough"give" that when popped into the mouth and given little squish with the tongue, they pop, filling one's mouth with aromatic sweet palm sugar syrup. Mmmmmm!

There seem to be 2 distinct groups of recipes for Ondeh - Ondeh. Those that use sweet potato and hardly any glutinous rice flour and those that use only glutinous rice flour (plus a smidge of tapioca flour). The former I find too soft and not toothsome enough. The latter can be quite rubbery, especially if there is too little filling in the dumplings. After a bit of experimentation I've came up with a compromise, which I'm posting today.

The key to this recipe is to make "test balls" as the humidity, water content of the sweet potato will affect the final consistency. Don't make up a whole batch of dumplings only to find that they don't meet texture / consistency expectations once cooked.

Some of the instructions and ingredients are appropriate for cooks in places without Asian grocery stores. Fresh Screwpine leaves and grated fresh coconut is ideal when available, but Pandan flavouring paste by Koepoe Koepoe (easily bought online from Amazon.com) and desiccated coconut works well. The panda paste is intensely fragrant and dark green, so no further colouring is needed. Dark demerara sugar or muscovado sugar if you cant get hold of palm sugar or gula melaka (coconut sugar)
Pandan Paste

Ondeh-Ondeh
(makes 36 dumplings)

Ingredients:
1 medium sweet potato - white / pale fleshed is best - about 400g
1.5 Cups Glutinous rice flour
approximately 1/3 Cup water
1 tsp pandan (screwpine) essence
1/3 - 1/2 Cup finely shaved palm sugar / gula melaka (coconut palm sugar)
200g finely shredded desiccated unsweetened coconut
1/2 tsp fine / table salt

Rehydrating Desiccated Coconut:
Mix the desiccated coconut with salt, spread on a 9inch pie dish and steam over boiling water for 10minutes. Let cool completely before use.

Make the dough:
1. peel and cut the sweet potato into 1cm cubes
2. steam / microwave for 5min till cooked and soft.
3. mash (and sieve if you are really finicky) and let cool completely
4. mix in the glutinous rice flour, panda essence and enough water to make a dough that has the consistency of plasticine or "playdoh"
5. Cover with cling film to prevent the dough from drying up

Making a well in the dough
Cook the dumplings:
1. Bring a pot of water (about 1.5L) to boil and keep simmering on low heat
2. Make batches of dumplings - about 10 at a time
3. Pinch off enough dough to make small round balls of dough about 2.5-3cm diameter
4. Use a finger to make an impression in the ball and work the dough to create a little well for the sugar. With practice, the wall of dough becomes really thin ideally about 2-3mm thick and leave room for lots of sugar !
5. Carefully place 1/2 tsp sugar into the well and close the dough over it, gently roll the ball in your hands and set aside. Repeat process till you have 10 little filled dough balls
6. Gently lower the balls one at a time into the simmering water (they will sink)
7. Once the dough balls are cooked, they will float
8. Remove the balls from the water with a skimmer / tea strainer / slotted spoon
9. Set aside on a non stick mat / baking sheet to drain briefly
10. Transfer to the pie dish with rehydrated coconut and roll to fully coat.
11. Set aside and repeat steps 3-10 till all the dough is used up


When dough is cooked, the balls will float 


Roll cooked balls in coconut


Dumplings are best eaten at room temperature - they will keep, covered in the 'fridge for a day or two, but let them come to room temp before eating. When eaten warm, they tend to be too soft.

Coconut sugar oozing out...


Enjoy... keep lots of Kleenex handy to catch drips! Mmmmmmm....


October 25, 2014

Campagnolo Roma

I have not been to Vancouver for a while.  So when I had to come to Vancouver for work, I was determined to eat good food!

I was watching Guy Fieri on Diners, Drive-ins & Dives the day before I flew to Vancouver.  He went to an Italian pizza place in Manhattan called Don Antonio by Starita.  The pizzas looked good.  I was inspired.  Well, I am sure Vancouver has a restaurant that serves good pizza.  I did some research and found Campagnolo Roma.

My foodie partner-in-crime and I arrived after 7.00pm.  There were two guys ahead of us.  I like the fact that Campagnolo Roma is a walk-in restaurant - no reservations unless it is a big group.  It was full.  There was a table outside with complimentary fleece blanket if we wanted it but we decided to wait for a table in the restaurant.  We left our names with one of the very enthusiastic and friendly female staff, and waited for slightly over 15 minutes before she sat us by the window.

We decided to share a Verdissima pizza - charred scallions, spinach, garlic, grano padano and basil, and  the Tagliatelle cooked with milk braised pork hock ragu, rapine, pecorino and rue.  The female staff said both of these were her favourite.  We invited her to pull a chair and come join us.  Alas, she had to work.


Delizioso they were!  I love the thin crust pizza, and the toppings were very unusual.  What was more unusual was the pizza spice that she brought in a small plate.  That pizza spice rocks!  We added it into our pizza and pasta.  The Tagliatelle was well seasoned and pork hock, tender.  I am sure it would have been better if the pasta arrived hot and not just warm.


Verdissima 


Tagliatelle


Pizza spice

The total bill came up to CAD90 including a carafe of Altesino, a Cappucino and 15% tip.  I would definitely come back for great food, great service & lively ambience.

Campagnolo Roma
2297 E Hastings St,
Vancouver, BC V5L 1V2

August 27, 2014

putting down roots?

Hmmm... is pilgrim going to put down roots? We have been ruminating for a while and Rossland is a lovely town, we've looked at houses for sale, even lots to build on. And if we do build our forever house, it will be energy efficient, warm in winter, cool in summer... future proof - what big demands! A Passive House would be great!
It'll be a pretty big undertaking - so watch this space... or we might start a separate chronicle even.

July 31, 2014

O Canada!


When we first visited Canada as tourists many years ago, we saw "poutine" as one of the myriad offerings in the Food Court of a neighbourhood shopping mall. Curious, we shared an order between the two of us and weren't overly impressed by the combination of soggy oily fries, overly salty gravy the color of wood varnish (and about as much flavour) and bright yellow plastic cheese grated over it.

Perhaps our palates were not used to this particularly Canadian dish? We asked the Canadians who were hosting us and the response was: "poutine? POUTINE? you ate poutine ??" (roll eyes) "Sooo unhealthy!!"

Well, that was a while ago and since then we have tried a few more plates of the stuff, a few good, mostly bad. And learnt that you should not have grated cheese in poutine (sacrilege!)

But what IS poutine anyway? Well, as far as ingredients go, it has to have potato in the form of fries, real cheese curd - the type that squeaks when you bite into it and most importantly, a really good gravy, the type only your mom can make (if she is French Canadian).

According to several sauces (pardon the pun), it was invented in Quebec in the 1950s when a customer at the restaurant Lutin Qui Rit wanted to have french fries to go, and also by the way, could he have some cheese curds and gravy along with it. The restaurateur was reported to have said "ca va faire un maudite poutine" (That's going to make a damn mess).

So to celebrate out having been in Canada for 2 years, we decided to make a genuine home version of this dish. A healthy version, so as not to freak out out health conscious friends. Real cheese curd we obtained from our local supermarket, low fat oven baked fries and a lower fat, lower sodium home made gravy.

"Our Poutine"
1 bag sqeaky cheese curds about 450g
1 recipe low fat over baked fries
1 pint gravy
 

Oven - baked chips (not french fries)
large baking potatoes - I use all purpose, but  Yukon Gold is really tasty if you can get them

  • Wash, scrub and peel if desired, cut into thick chips
  • Blanch in boiling salted water (1 tsp salt to 1.5L water) for 10min
  • Drain & pat dry
  • Toss in a bowl with a sprinkling of olive oil, freshly ground sea salt and pepper
  • Don't worry if chips get a rough surface - that will become a wonderful crunchy coating
  • Lay on a well greased heated baking tray in a single layer*
  • Bake in pre-heated oven 400F for 20min, turning over halfway**
  • If chips are not brown at the end of cooking time, stick them under the broiler till desired brown-ness.
* place the baking tray in the oven while it is being heated up
** If you have a touch of Obsessive - Compulsiveness, you might turn each chip individually, I just use a fish slice / spatula

Home made gravy
  • 1 Tabsp ketchup
  • 1 tsp Worcestershire  sauce*
  • 1 tsp chicken stock powder*
  • 1 tsp beef stock powder*
  • 1 Tabsp corn starch #
  • 500ml water
  • salt & pepper to taste
  • tiny pinch smoked paprika
  • 1/2 tsp dark soy sauce (for color)

Method:
combine all the ingredients in a saucepan, bring to boil, add more cornstarch if you want it thicker
* vegetarian version would omit these 3 items and use vegetable and mushroom stock powders and a teaspoon of nutritional yeast for more umami
# for a better "mouthfeel" and richer taste, make a traditional roux with butter and wheat flour


To Serve:
place warm fries in a deep dish, top with as much curd as you want, and as much gravy as you like!

July 25, 2014

The King of (Grilled) Mushrooms

"Chi mangia bene, vive bene" ... we learnt this phrase from a couple of incredible Italian nonagenarians last week. And how better to "mangia bene" than to eat King Mushrooms.

In our recent foray to Ferraro Foods we managed to get our hot little hands on what has become one of our favourite mushrooms - the King Trumpet Mushroom, otherwise known as Pleurotus eryngii. It's the largest of the oyster mushroom genus and oh my, does it provide a toothsome feast.


One of our favourite ways of cooking this mushroom is to slice it longitudinally into 3mm slices, marinade it overnight (or at least 3-4h), grill it and serve it on a bed of pasta aglio olio pepperoncino. As a rough guide, 1 large mushroom is good for 1 serving.

Grilled King Mushrooms
Ingredients:

3 large King Mushrooms

Marinade:
  • 2 Tabsp Olive Oil
  • 2 Tabsp Dark Soy Sauce
  • 1/2 tsp smoked paprika
  • 1/2 tsp dry mustard powder
  • Freshly ground sea salt (amount depends on how salty your soy sauce is)
  • Freshly ground black pepper
Method:
  1. Combine all the ingredients of the marinade
  2. Slice mushrooms lengthwise into 3mm thick slices
  3. Pour marinade over the mushrooms
  4. Turn mushrooms over periodically to ensure all surfaces are coated
  5. Grill under a hot grill till nicely brown on both sides

While mushrooms are on the grill, prepare your pasta of choice

Pasta Aglio Olio Pepperoncino
Ingredients
  • Pasta for 3
  • 1 Tabsp finely chopped garlic
  • 3-4 Tabsp olive oil
  • 1 tsp chilli flakes
  • 2 Tabsp finely chopped parsley

Method:
  1. Prepare 3 portions of pasta according to package directions but make it very al dente
  2. Whilst pasta is boiling, heat 3 Tabs olive oil in a skillet
  3. Add the chopped garlic and chilli flakes and fry till garlic is fragrant but not brown
  4. Drain pasta, reserving about 1.5 cups of pasta water
  5. Add pasta to skillet, with about 1 cup of pasta water, add parsley and mix well with chilli - garlic mixture. 
  6. Bring to boil and test pasta for done-ness (this is why you want to remove the pasta from the water when it is just short of "done" - cooking it in the sauce for another 2minutes or so makes it much tastier, without getting soggy. And if you have good "bronzato style" pasta, the sauce sticks on the rough surface and makes for a much tastier mouthful)


Serve mushrooms on top of pasta, top with a poached egg if desired and generous parmesan shavings. Mangia!


July 22, 2014

BBB Time!


It was World Cup 2014 final day and we were too busy watching to fix anything fancy. And we really didn't want to be slaving over a hot stove. Besides, it was waaay too hot outside and inside the house to be fixing anything fancy.

The easiest thing was to quickly put together some burgers and chips and have everything cook in the over at the same time.

Just in case you are looking for a recipe for juicy beef burgers - we made those 2 weeks ago but in our haste and greed to eat... we forgot to take pictures - so I'll post that in the near future...). These are vegetarian burgers and our chips are low fat, oven baked, not quite full fat, but certainly full flavour!

Black Bean Burgers (BBB
  • 1.5 cups cooked black beans, well drained, roughly mashed with a fork*
  • 1 Tabsp ketchup (Heinz of course!)
  • 1 Tabsp nutritional yeast
  • 1 tsp sweet paprika (smoked will give a nice char grilled flavour)
  • 1 small carrot - grated
  • 3 stalks celery - finely chopped
  • 1 cup rolled oats
  • 1 tsp crunchy deep fried shallots (from Asian supermarkets)
  • 1 tsp crunchy deep fried garlic (from Asian supermarkets)
  • 1 egg
  • salt and pepper to taste (test fry a small batch)

*do not use a food processor - it becomes too mushy

Method:
  • mix everything together and form into 4 patties - I used a 4"egg ring to help shape and pack the mixture in
  • place on tray and refrigerate for an hour to firm up
  • Bake in oven with chips - at 400F, for 15min, turning halfway to get both sides nice and brown

Oven - baked chips (not french fries)
large baking potatoes - I use all purpose, but  Yukon Gold is really tasty if you can get them

  • Wash, scrub and peel if desired, cut into thick chips
  • Blanch in boiling salted water (1 tsp salt to 1.5L water) for 10min
  • Drain & pat dry
  • Toss in a bowl with a sprinkling of olive oil, freshly ground sea salt and pepper
  • Don't worry if chips get a rough surface - that will become a wonderful crunchy coating
  • Lay on a well greased heated baking tray in a single layer*
  • Bake in pre-heated oven 400F for 20min, turning over halfway**
  • If chips are not brown at the end of cooking time, stick them under the broiler till desired brown-ness.
* place the baking tray in the oven while it is being heated up
** If you have a touch of Obsessive - Compulsiveness, you might turn each chip individually, I just use a fish slice / spatula

Maybe we should have had frankfurters and sauerkraut and beer... considering who won the World Cup! DFB Weltmeister!

July 14, 2014

Summer Time and the livin is easy...

It's a scorcher of a summer so far... at least it is now, after a tentative rather wet and cool start. With temps reaching 38C and our apartment catching the full brunt of the afternoon sun - we could be excuse for thinking we were back in the tropics.

Nearly... but thankfully not as hot! Strangely, this heat has fired an appetite for hot and spicy Asian food. Kimchi, Nasi Lemak...  curries with home made prata (Thanks to excellent instruction on Dr Tay's blog)

Roasted Char Siu

Anyhow, inspired by a recent FB post, we had a sudden longing for char siu  (叉燒 ) or chinese BBQ pork. I've never really been a fan of it because most of the time it is either dry and tasteless or covered with a lurid red dye. I do remember with fondness that it was one of the first things I remember my mother cooking and it seemed appropriate that I remember her on her birthday by cooking this. And she did make a really delicious version of it, moist and tender with crispy burnt bits that we all vied for as children.

I chose shoulder butt as it has a good mix of fat and lean - you need a bit of fat to keep the meat moist - and it mostly gets rendered out during the cooking anyway.

This recipe is best prepared the day before, so that the marinade has time to work its magic.

Ingredients:
  • 1kg pork - cut into long strips about 3cm thick
  • 2 Tabsp honey
  • 2 Tabsp Hoisin Sauce
  • 1.5 Tab dark soy sauce / kicap manis
  • 1.5 Tab light soy sauce
  • 1 tsp ground white pepper
  • 1 Tabsp sesame oil
  • 1 Tabsp Hungarian sweet paprika (for sweetness and colour)

Method:
Day before:
  1. combine all the ingredients together in a non reactive bowl
  2. place the pork strips into a large Ziploc bag
  3. add 3/4 of the marinade into the bag and mix well to coat the pork
  4. place in fridge overnight (or at least 4-6h)

Next day:
  1. preheat oven to 350F
  2. place a rack over a deep (2cm) baking tray and fill the tray with about 1cm of water
  3. place pork strips on rack and place tray in the middle shelf of oven
  4. roast for 45min

Reserved sticky sweet savoury marindae
Turn oven off and turn grill on
  1. remove pork from oven and baste with reserved marinade and grill for 5min till nicely brown 
  2. take pork out, turn over and baste again, grill other side for another 5min

Watch the meat! the sweet marinade leads to easy charring - but we do want a bit of that yes?

Once nicely brown, take the meat out, let it rest whilst you prepare the gravy

Pour meat juices into a saucepan and add the remaining marinade, reduce and season to taste - you made need to add a bit more soy sauce, some may wish to use a touch of cornflour to thicken and give it a sheen.

Slice pork as thick or thin as you desire, serve of fragrant steamed Thai jasmine rice. Mangia!

Char Siu Rice anyone?

January 21, 2014

Staffordshire oatcakes

Burn's night(Jan 25th) is coming up and thinking back on our success with home-made haggis last year, we thought, "Can't we make oatcakes at home?" (we really liked the Walker's oatcakes that we ate with our home-made haggis, neeps and tatties).
So, we decided to search recipes to make oatcakes on the internet, and found several recipes for oatcakes. Quite often with surfing the net, one gets distracted from the original quest and we decided to try something we could eat for a hearty winter breakfast - fuel for the furnace before hitting the slopes!

And that's how we came to try recipe for Staffordshire oatcakes from Food.com. They looked easier to make and besides, we had watched a program on TV just the other night (you can find the video in full here) that gives a bit of background into this rustic snack that originated on (surprise!) North Staffordshire and are usually eaten with savoury fillings in contrast to maple syrup and butter.

This delicious pancake requires some forward planning so, we prepared the batter the night before and left it in the fridge to rise overnight.

Oatmeal batter before rising overnight


The next morning, half expecting the fridge door to be ajar and us having to wade through gloopy batter overflowing from the fridge, we opened the bedroom door and... it was all good. The batter had risen nicely and stayed in the mixing bowl. The next step was simply to fire up the stove, stick a skillet on and fry them like any other pancake. Traditionally, these oatcakes are about 8 inches in diameter (so that you can wrap bacon, cheese, sausages and other wicked stuff in them).

pancake cooking in the skillet, note bubbles on the surface

Once the bottom is golden (about 2-3min), carefully turn them over (these oatcakes have less flour than regular pancakes and are more crumbly) and cook for another 2-3 min.


Golden Staffordshire Oatcakes

We tried them savoury (with fried Spam and cheese and ketchup) and sweet, with butter and maple syrup as well as with peanut butter and jam. All three were delicious, but I think it was best savoury. Try it! let me know which filling works best for you!

RECIPE:
Ingredients:
  • 150g fine oatmeal (whiz up regular oatmeal if needed)
  • 150g lb wholemeal flour
  • 300ml Cup water
  • 1 tsp salt
  • 1 7oz sachet dry yeast

Method:
  1. Heat water and milk in saucepan to 30C
  2. Mix all dry ingredients together with a whisk and then add the warm water/milk and whisk till well mixed. It will be quite runny.
  3. Cover bowl with clingfilm and leave in a warm place for at least an hour (till nice and bubbly) or overnight in the fridge.
  4. When ready, give batter a good stir and cook on a lightly greased griddle or skillet. The pancakes are traditionally about 6-8inched wide and quite thin.
  5. Cook for about 2-3min on one side, until golden and then flip over gently and brown the other side
  6. Keep on a warm plate whilst remaining are cooking.
The recipe yields 6 large or 8 medium oatcakes


January 19, 2014

Chinese Style Steamed Fish and Oysters

Coming to the end of the week and looking forward (?) to a weekend "on call" for work, I was hankering for a good chinese seafood dinner.

With the rather poor options for eating out in our little town, the best alternative was to cook. So, popped into the local - very good - supermarket (Ferraro's Foods), I picked out the freshest bit of fish I could see. And it so happened to be sole, a lovely bit of finely textured white fish, perfect for steaming. And it was on "special" too! Yay!
Hmm... the fillet was a bit small, so quickly asked for a tub of Fanny Bay Oysters also on sale for $3.90. Yum, this would make a tasty combo.

Once home, it was a simple matter of cooking some fragrant Thai Jasmine rice in the microwave whilst the seafood was being prepared. In the time it took for the rice to cook, all the prep work plus steaming of the fish was done and all I had to do was to precisely time the frying of shallots and garlic and pour the resultant hot oil mixture over the fish with a very satisfying sizzle!

The fish was done just right, flaked beautifully, melt in mouth tenderness, the mild flavour served as a foil for the aromatic green herbs and crunchy onion and garlic bits. The oysters turned out better than expected - plump, juicy and still with a slight crunch. Again the fragrant oils and green herbs complemented the briny almost metallic taste of the bivalve.

Would have gone very well with a chilled Riesling... but next time perhaps!

Ingredients:
  • 1 large fillet of sole (or similar, halibut will do nicely too)
  • Fresh oysters, (shucked, optional)
  • Cilatro leaves, fresh, roughly chopped
  • Spring Onions, fresh, finely sliced
  • dried garlic flakes
  • dried onion flakes
  • 1 fresh red chilli, finely sliced
  • fresh ginger - about 1 inch - finely juliened
  • peanut oil - 4 Tbsp
  • sesame oil - 1 tsp
  • light soy sauce - 3 Tbsp

You'll also need a large wok with cover or a steamer

Method:
  1. make sure the fish has been thoroughly deboned, cut into large portions about 5x8cm
  2. lay fish in a heat proof dish (e.g. Pyrex)
  3. lay the shucked oysters over the fish, generously layering juliened ginger in between and over all the pieces of seafood
  4. bring water to boil in the wok, and place dish with seafood onto a steaming rack, cover and steam at high heat for 5min
  5. Whilst fish is cooking, heat peanut oil in a saucepan, add dried onions and garlic to brown - this will take about 2 min, so time it to coincide with the end of the 5min cooking time for the fish
  6. Once fish is cooked, remove from steamer, drizzle with soy sauce, sprinkle with cilantro, spring onion and red chilli and pour the very hot oil over the whole assembly. (it was sizzle and spit!)
  7. Serve immediately - Enjoy!